Here we have the directions for this amazing plan. I hope we can do this, although we have a normal garden also.

Here we have the directions for this amazing plan. I hope we can do this, although we have a normal garden also.
I have a bed for strawberries and so far they are really blossoming this Spring. Someone told me that in Florida they grow onions with strawberries, but this guide I found doesn’t say that, although it doesn’t say not to plant them with strawberries either.
http://strawberryplants.org/2011/03/companion-planting-strawberries/
I see it says not to plant near the cabbage plant, but bush beans are good, so I will probably plant beans in the bed closest to the strawberries.
Went out and took some pictures – so fresh and nice after rain and will be warming up soon.
another interesting thing – wicking beds http://www.urbanfoodgarden.org/main/wicking-beds/wicking-beds.htm – the same as self-watering containers I think.


I’ve been reading about keyhole gardens where you put a compost thing in the middle for your kitchen scraps, etc. and then water it through that and so here I have put the circular wire and I am adding the kitchen scraps. I will cover the compost leaves with peat moss, vermiculite and more composted compost, as in the new square foot gardening book.

I don’t know what these lovely flowers are, but I’m glad they are growing so nicely. I planted some wildflower seeds here and so I will eventually find out what they are.

Potato plants popping up nicely through the straw.

Meadow Sage is a winner!

Love the tulips !


Today is Maundy Thursday, a day to remember Jesus eating His last supper with His disciples which led up to His crucifixion and then resurrection.
I am busy cleaning and planning for family Easter dinner at our house. It’s a matter of cleaning bathrooms, dusting, vacuuming, straightening up and planning and fixing the meal. It will be a nice day to remember the new life we have because of Jesus’ obedience.
Thank you, Lord, for Your perfect sacrifice!
I enjoy seeing the new growth of the lettuce and making a couple other swc containers and transplanting other plants and seeing seedlings grow. It’s getting springy out even though some snow is still with us.


6 hours later – most of the snow is gone

getting ready to put my seed potatoes that are sprouting in the sack in this space I cleared of leaves – wonderful compost type soil for the potatoes.

I planted some lettuce seeds in this newly made swc this morning. Hopefully it will turn out well.
 Here are some basic steps on making one.
1. Find a container to use and cut it apart a little more than halfway down. The bottom part is the water reservoir.
2. Punch or slit some small holes around the bottom part of the soil container. You can put felt in the bottom of where the lid was to wick up the water. In this case it was a weird shaped container so I cut it off and put it back in the top part because the top of the bottle was so long. If I would have used felt maybe so much soil wouldn’t have gotten into the water reservoir, but it doesn’t really matter.
3. Water the container from on top the first time.
4. Place seeds on top of soil and then a bit more soil to cover the seeds. Water a little more.
5. It should be a long time before it needs more water, but when it does, lift the soil reservoir and just put some water into the reservoir.
6. Cover it and place in safe place and wait for it to sprout.
Concerning my weight loss, I found out I should only eat slightly more than 1300 calories per day. So far I’ve had a Granny Smith Apple, 4 small pieces sourdough bread with sunflower butter, agave syrup and raisin, all which come to at least 470 calories. Will need to consume a bunch of celery and raw veggies today. Yay
Here’s my 2nd one today then must make soup.
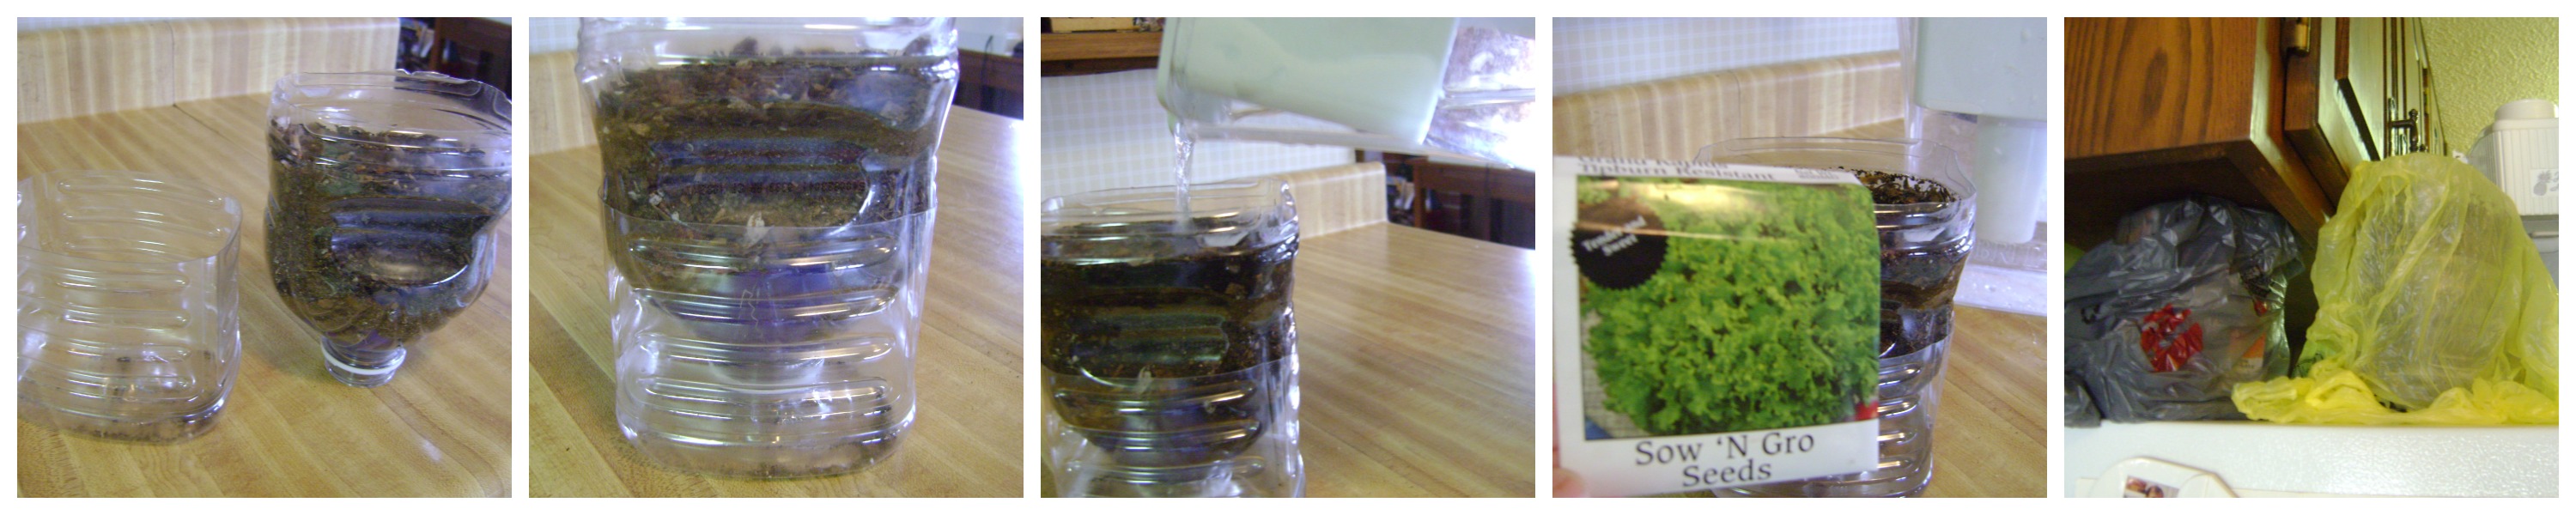 1st picture – cut container, made slits in soil container, put felt in opening
2nd picture – placed soil container in reservoir
3rd picture – watered from the top
4th picture – put in some lettuce seeds and covered with a bit of soil
5th picture – placed on top of ‘fridg with other one I made today
update 3.24.13 – have some sprouts:

I worked on my first self watering container – took some pictures as I went along. Yesterday I bought the 10 foot drain pipe and tried to buy the 1″ PVC pipe but they messed up on the pricing and charged me $6 something instead of $1 something, so I’ll get that later somewhere else.
First we need the tools.
The drill is for drilling small holes in the lid (next picture). The clippers and saw are for cutting out most of the lid.

 I cut it too far in so had to go back on the long sides and cut closer to the edge. Then I duct taped it on.
 Next I put 4 containers in it – the main thing is they should be the same height and have some holes in them for water to flow through them. They support the lid.
I cut 2 lengths of drainage pipe the same as the black pots so there would be enough support. The video in my previous post said to use all drainage pipe, but there is lots of wiggle room here to do whatever works and use what you have.
Then I cut 2 circles in the lid top for the 2 drainage pipe pieces to fit in them – they go above the lid and will be filled with dirt. The water will rise up through these and be able to reach the soil reservoir where the plants will be planted.


 The upper right hand corner I left open for the UPC 20″ long and 1″ wide pipe. This is where the SWC is watered. Although, first it is supposed to be watered on top to get it going, then only through the pipe.
After the soil is put in, seeds may be planted or transplants placed in it. Black plastic (trash bag) should be put on top so that when it rains it won’t be flooded. The outer rim of the lid will hold the black plastic in place.
to be continued 🙂
